I felt a little fancy today, so I put on some jewels. LOL I took this in ONE TAKE…I repeat..ONE TAKE!! Hahahha had fun with it. I am sure I will loosen up even more in the future and you will think I am NUTS.…Sometimes I say goofy things, and I never remember the names of things..It’s always….ya know, the “What-cha-ma-Call It!!” or “ THINGY!!” Anyway, I hope you take way something that helps you. Oh, one more thing..sorry about the loud heat gun..I turn if off right away…remember these are unscripted, adlibbed and done as fast as I can. Downloading these clips take forever. I know there has to be a faster way. I have to figure out what zip files are all about!! Hahah.. always something to learn huh? Thanks for stopping by. Show how much you care about someone today…........“Talk less and listen More” :)
Thursday, April 30, 2009
Wednesday, April 29, 2009
Success is a Journey... Brooch Card
 Today I made a card using two challenges. The first one was the Wednesday SCS "Sketch Challenge" (SC226) and the second one was"Feeling Sentimental" (CSSC66) - in the Crafty Secrets forum of Splitcoaststampers. This card has a removable Vintage Brooch. It's like two gifts in one. I used the ole' "Foot File" technique on the edges of the card stock, detailed sewing, cuddlebug on the background paper, distressed inks and clear embossing on the sentiment. I have a lot of projects in the works, and I hope you stick around for them. You will not want to miss what is coming to "priscillastyles" blog soon. Ok.. back to work.
 Monday, April 27, 2009
Mojo Monday Sketch Challenge #84
 CLICK TO ENLARGE
 I went a little fruity with this morning’s Mojo Mondays Sketch Challenge. It was fun..Of course like always I put my own interpretation on the sketch while still sticking to the layout. I also incorporated TLC218 - Marble Technique from SCS (it is the background purple swirls) How do you think it came out? I have a lot of exciting news coming soon and watch for my next “Prissy's Tip Clip” it will be helpful tips on embossing. Oh and if you want to check out my ATC Swaps I just posted them. Make someone laugh today and give them a little tickle!! :)
 Sunday, April 26, 2009
My ATC Swaps!!


As promised, I finally took pictures of my ATC Swaps, I just love each and every one of them. This swap was for ATC’s (2 ½ inches x 3 ½ inches) featuring the Stampabilities lines: House Mouse, Griffies or Happy Hoppers. These little guys were so fun to work on. Your swap must have had on it, at least two layers of quality card stock and at least one embellishment. Each slot was an 8 + 1 swap. You send in 9 ATC’s and you get 8 back. The 9th one goes to the hostess. I only entered for one slot. There were 21 participants. I wish I would have taken two slots. LOL they are just so darn cute!! I think this may be another addiction of mine. LOL I wanted to thank the Ladies over at SCS for welcoming me into their swap with open arms. They are such a nice group of talented ladies. Tina, thanks for inviting me to play and a special thanks to Joanna, our swap hostess. She had the task of organizing this and picking out the top two of the swap. Lucky me, my very first swap and I got co-top pick. Thank you Joanna for my lovely prize :) I have posted pictures of the swaps and I added one of the ones I made in the pictures too. Who can pick out my swap??
CLICK ON THE PICTURES TO ENLARGE :~)
Unscripted Sketch Challenge #3


Saturday, April 25, 2009
Prissy's Tip Clip #1 (Sanding)
Prissy's Tip Clip #1 (Sanding)
Good Morning!!! I am so excited…this is my very first “Mini Short Video Tip Tutorial” I taped it last night, cuz that’s really the only time I can do anything without chatter box kids running around in the background. LOL… OK..I was a little bit NERVOUS and I couldn’t even get the name right. “Prissy’s Tip Clips” say that 10 times fast!! Hahahhaa.. Anyway, my little shorts are designed for you to take away something that may help you with your crafts. These tips are just to give you a little insight on what I do and are meant to be just “simple” informational tips. I am a very practical crafter and sometimes use things that are just lying around the house. I have been interested in crafts of all kinds for years and pick up stuff all over the place. Who knows where I found these. So that being said, my first tips are about sanding techniques and tools. Enjoy the video and don’t laugh too hard at my first attempt at this. I PROMISE it will get better. I know my camera angle needs some work and the volume fades in and out, but that will all get better with practice. Have a great weekend and remember to video tape your kids as they grow, you will regret it if you don’t. (p.s. my foot file has only been used for my crafts and I have never used it on my feet..hahaah!!)
Oh, Last thing….If you do watch the video, all I ask is that you PLEASE leave me a comment & let me know you're watching and what you think.
Thank you so much for stopping by and for joining me on my journey!!
Fish Card created for the "Prissy's Tip Clip"
 Chrimp paper first and then sand (click for close up)
 Background paper was embossed on a cuddlebug, then lightly sanded to make the texture pop.
Please leave me a comment with your thoughts :)
Wednesday, April 22, 2009
Vintage butterfly and Asian Pearl
 I would like to share a couple of cards that I have been working on. My first one is the Gesso Resist Challenge (TLC217) I really struggled with this one & I really did not get the technique down, I didn't have Gesso, so I improvised. Well, I sure had fun trying! Here's some information from SCS regarding Gesso: Gesso is an art supply used as surface preparation or primer for painting, gilding, and sculpting. Its origins are uncertain, but gesso is believed to have been developed in Italy, since the word gesso is Italian for 'chalk'. Preparation varies according to intended use, but usually consists of mixing glue with plaster, chalk, or gypsum. If you take a close look at the background print. You can see where I stamped solid butterflies, clear ebossed them & then shaded around the edges. It is very faint, but still a cool effect. I finished it off with a wonderful piece I got from Jessica Brown.
 The above Asian style card was today's SCS Sketch Challenge. I hope I did it justice. The image is embossed and then, of course painted with my new Copics. Embellished it with some broken jewelry from my stash. I still have to finish off the insides and make up envelopes for them, but I really wanted to get them posted. If you like my work, I would love for you to follow along on my creative journey. I have so much to share, I wish I could do this stuff 24/7 but I have those little ones to look after. Shoot me a comment and let me know what kinds of things you would like to see from my blog. I have so many ideas, I am not sure which direction to go next, so Please leave me a comment with your thoughts :) Hug someone a split second longer today!!
 Tuesday, April 21, 2009
My little Girl's "Funny Face"
Hi everyone, I know this is REALLY SILLY, but it is only just a TEST! :) I am going to start my "Prissy's Tips" soon and I want to do them via video. I think It will be much faster and easier to understand. What do you think? The following video is of my daughter a couple of years ago...she is so darn cute...she would always do these cute funny faces. I was able to catch just a little one on tape. It always makes me smile..they grow up so fast..oh the love we have for our own is so strong huh? It is short but sweet..she has a little scream at the end, so you may want to MUTE LOL. Hope it at least gives you a smile. Anyway..stay tuned..I am working on those helpful tips, tutorials and card samples.
Have a Wonderfully Creative Day!!
Monday, April 20, 2009
Mojo Monday Sketch Challenge #83
 Good Morning everyone..I just had to get my Mojo fix before I started my day. I tweaked the sketch a little bit and the picture is a little dark cuz I wanted you to see all the texture. This is a BRIGHTER PICTURE. The image is hand stamped and embossed with navy blue embossing powder. Click to enlarge to see the vintage brooch. I am working up a very special envelope to go with this card. It will be a mega collage envelope with a vintage brooch closure. View MORE? Hope you enjoy your day :)
 Sunday, April 19, 2009
"Dragon Tales" Copic Markers Card
 This is what I would like to share with you today. I am loving those Copics! Had to do this Dragon stamp I just got. How do you think it turned out? I thought to myself..how perfect to really test out these Copics. Oh, you can click on the picture to enlarge, or If you want to see this card in it's entirety then just click HERE. Another little bit of info I would like to share is, along with my tutorial series, I am going to start a couple ongoing post series. The first one is called "Prissy's Tips" They will be "Mini Short Tutorials" short but sweet posts that include fun card making/craft tips. The other one will be a post that features another card artists work. I am just amazed at what some of these artists are coming up with and I would love to feature their work on my Blog. If you are working on a special something, or are especially proud of a project. Please feel free to post here or email and let me know. You may just be my next featured artist. Ok, I am off to work on my newest envelope design. Don't forget to tell someone you love them today.
 Friday, April 17, 2009
"Basic Thick Envelope" Tutorial
 This is going to be the first of a series tutorials that I do. I will start with the basics and then work my way up to the more advanced projects. They will be spread out, so stay tuned and watch for all different tips and demos coming in the future. Today I am going to start with a THICK box style 6"x 6"x 3/4" envelope. I want to thank my husband because he has been instrumental in helping me perfect my “Thick” style envelopes. If you do not know me, my styles of cards are always quite thick and the majority of the time have vintage brooches or bulky embellishments on them. I was faced with an envelope problem early on and posed this question to my husband. How can I fit my thick card in a standard style box envelope? Well, I couldn’t and that is when my loving husband stepped in to help me. He is really good with figuring out things (as you will see as my advanced tutorials come up) He created a template for a 6”x 6”x ¾” Envelope. It seems easy enough right? Not for me, trying to make those edges line up, be even and have enough area for the adhesive and closure can be a challenge. Not for my hubby, he worked it out and now I have the perfect “Basic Thick Box Style Envelope Template”. Thank you honey! Please note, I use a lot of Stampin Up products, because I became a demonstrator last year for the discounts. Please feel free to check out my SU website, but use what ever product brand you like ....Ok, Lets get started!! :)
 Items needed are a Cutting Mat, Hobby Blade, Paper cutter with scoring blade, Bone Folder, Mini Glue Dots, Sticky Strip, Paper Snips, Velcro and my special tool,” Thinking inside the Box” by “priscillastyles” This is a block style aid for making thick style envelopes. I do not know how many times I would try and line up my envelope edges to find that they were slightly off, it had gap openings, was lopsided, did not have enough room for the adhesive, you name it, I have done it. Well, after my husband made the block for me, one of my scrap booking friends asked if he could make her one. He did and she loved it! She encouraged me to share it with other card makers. Well, with a lot of sweet talk, I was able to convince my husband to make up some to share with who ever would like to try them. My husband builds model airplanes for a hobby and used his supplies to make up a few. All he asked was that if I did share with people that we do not lose money in the process and I had to copyright it. So after figuring out the supplies, cost, paperwork and literally pennies for my husband’s labor, you can now buy a
"Thinking Inside the Box"
by “priscillastyles” on EBay
me HERE on my blog, you will receive the discounted price.
OK here we go…. my husband was helping me take the pictures and was standing on an unstable step stool to take these pictures, so I literally made this envelope in 10 minutes…
STEP ONE….
Using the provided template, trace and cut-out card stock.
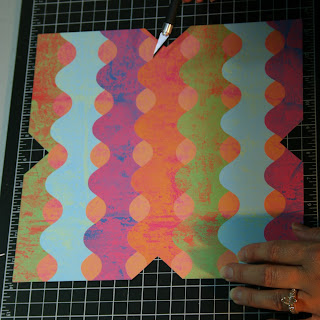

STEP TWO….
LIGHTLY score the inner side of the envelope, from V to V, all the way around. Make an additional 4 scores from your original score. (See template lines.) HINT: Always use light pressure when making scores being careful not to penetrate your card stock material.
 STEP THREE….
Using a bone folder, following the score, make nice crisp folds.
 STEP FOUR…..
Center the “Thinking Inside The Box” block tool on the envelope.

STEP FIVE…..
Place two mini glue dots on the inside of one of the outer flaps. Making sure your “Thinking Inside the Box” block is centered upon your work, align edges and connect the two outer flaps to the center.

 STEP SIX…..
Attach two long strips of Sticky Strip to the lower flaps outer edges. Center aid, remove backing and fold up to the center by pressing down with pressure. Due to using the block, the corner should meet perfectly in the center with the other flaps.

 STEP SEVEN…..
Cut desired size of Velcro and attach both pieces together. Remove the backing from ONE SIDE only and place the exposed adhesive side to the top corner flap. Remove the second adhesive backing, lower the flap – aligning it to the center – and firmly press. Pull the Velcro pieces apart and cut off any excess Velcro material.

 STEP EIGHT…..
Embellish your new custom-made envelope as desired. Be sure to use aggressive adhesive practices to insure that your embellishments are firmly anchored when your envelope is opened and closed.
I think the envelope is just as important as the cards you make. We all put so much effort into our handmade cards, so, don’t they deserve to have a nice keepsake style envelope? I hope you enjoyed my tutorial and I am really looking forward to sharing more tips and projects with you in the future. Feel free to email me with any questions, comments or concerns at
I will end with a quote I saw on Judy’s signature from SCS..thanks Judy :
" If you have a talent, use it in every which way possible. Don't hoard it. Don't dole it out like a miser. Spread it lavishly like a millionaire intent on going broke.
~Brendan Frances~
Thank you for stopping by and
Please feel free to leave me a question or comment.
Wednesday, April 15, 2009
MY BLOG CANDY Give-A-Way #1
A BIG THANK YOU goes out to all those who entered my drawing. I wish I could send you each some yummy stuff, but no worries, I will have more Blog Candy coming soon :)
And the WINNER is....... LISA L.
Lisa please email me with your mailing information ASAP.
 Who doesn’t love FREE stuff? Well, being a Stampin Up demonstrator has its advantages, so I would love to pass on some goodies to my fellow crafters. I would be happy to mail these items to the US and Canada. I may ship internationally in the future, so follow and stay tuned. Just go for it, IT’S FREE!! Last day to post is Thursday April 16th. Winner will be selected randomly on April 17th
Monday, April 13, 2009
Mojo Monday Sketch Challenge #82
 * CLICK PICTURE TO SEE UP CLOSE DETAILS*
"Here Fishy fishy fishy!!" (MOJO82)

Happy Monday everyone, I hope you had a wonderful holiday weekend. I am home now and have a ton to do. I just had to do my Mojo Monday Sketch Challenge and get it posted before I started on the unpacking and laundry. HA!! anything to prolong work huh? Well, I hope you like my interpretation of the sketch. I pretty much stuck to it. I wanted to keep it quick and easy this morning. I got to use the image I started before I left for the weekend. It was the very first image that I colored with my new Copics. Let me know what you think and I will check in later for an update with more details. Have a great day :) ...... trotting off to do housework. OMG I just noticed I forgot to put a sentiment!! Only a few more days till the winner of my blog candy is announced. You still have time to ENTER.
Thursday, April 9, 2009
Copic~Copic~ and some more Copics!!

 Oh my!! I am so excited. I got my Copics today. I could not wait to use them. I finally got the kids fed and in bed, so I opened up my goodies. They are so much fun. Check out the very first picture I colored with them. I will get better.. I just have to remember to stay in the lines!! HAahah!! Something I am trying to teach my 3 year old right now. Well, I can already tell these are going to be addicting. I had to restrain myself, because I thought I should at least test them before I bought the whole lot!!! "COPIC Sketch 322 Markers Complete Set" Yeah right! My husband would have a heart attack. I Did want to share with you that COPICmarkerS.com sells "CUSTOM" box sets which I thought was really cool. The Sketch 72 Marker Box Sets do not always have the colors you need. By purchasing the custom box you can pick and choose the colors needed and save a little money at the same time. Just a little tip before you buy the custom box, make a note to check and see if the colors you want are in stock first. You buy the Custom set first and then send them an email with the colors you want. Maybe I can talk my husband in to getting me the "Airbrushing System" for Mothers Day…keep your fingers crossed for me. This is a whole new adventure for me. Ok, back to those Copics… after the holiday weekend, I will have fun with some stamped images. I still LOVE the vintage prints, but I have found a new excitment about stamping again….and for a good reason don’t you think? Hubby is almost done with his envelope pattern document and I just have to type up the details for the tutorial. It is amazing how long everything takes. Tomorrow we will be packing for a long weekend away at our cabin..(yikes no computer LOL) So the two kids, two labradors, my husband and I will be heading out for a long weekend. I hope you and your family all have a Happy Easter and remember........don’t forget to count the eggs before you hide them!! LOL
Wednesday, April 8, 2009
Splitcoaststamper's Sketch Challenge
.jpg)
 Hello everyone . Today was splitcoaststamper’s sketch challenge (SC223). I had a lot of fun with it. I tweaked it just a little, because I am having so much fun with the Vintage Print Collage Fairies I have been doing lately. This card was inspired by the sketch, so I would like to thank splitcoast for that. To make this card, I raided my notions drawer and found some blue pillow trim. I decided to edge the center box (#3) with it after embossing the cardstock. With a little detailed blade cutting, embellishing the wings on the fairy, adding on some rickrack, flowers and rhinestones, this is what I came up with. Please leave me a comment on what you think of it. Also, just to let you know, my husband and I are working out the details for my Basic “Thick” envelope tutorial I will be doing soon. Here is an example of one of the "Advanced Thick Envelope" that I will be featuring in this series. Just click the ebay icon on the top right. I have a little surprise for my followers. My husband is really good at creating documents and has agreed to make up an envelope pattern for downloading. So, if you are not a follower, then jump on the bandwagon, because you won’t want to miss the detailed description and pattern coming soon. Plus, I have one more thing to share with you. It is a special tool that has been a big help to me while trying to line up the sides of my envelopes for that perfect flap over. There is nothing more frustrating than trying to get it just right and your envelope ending up lopsided. This tool is guaranteed to help prevent that. All will be revealed in a few days, so stay tuned. Subscribe, follow, link, comment on my blog candy post and you might just win my give a way. Thanks again for stopping by and be sure to leave me a comment. Hey, don’t forget to tell someone you love them today! For Detailed look of entire card set CLICK HERE!!
Monday, April 6, 2009
***Mojo Monday's Sketch Challenge***

)
 I would like to share with you my Mojo sketch challenge (MOJO81) card that I did today. For an up CLOSE look, just click on the picture. I used multiple layers, metallic textured papers, gold trim, rhinestones and some embossed images. I machine sewed the inside panels and then stitch around the outer edge of the front main card stock piece. I put Happy Birthday, because you can never have enough birthday cards right? This would be perfect for an old fashion gal's birthday. Heck, maybe I will keep it for myself LOL :) After several requests, in the next week or two, I will be posting a demo on how I make my "Thick" boxstyle envelopes. It will be the first demo of a series that I am planning. I will start with the basics and get more advanced with my demos as time goes on. Please feel free to post any questions or comments. Thank you for stopping by and check back often :) Blog Candy?
Sunday, April 5, 2009
"Pink Girl Fairy" Brooch Set
 Today I would like to share with you the rest of the set I have been working on. To view it in more details and a little more information on the items. Just click HERE. Thanks for stopping by and please let me know what you think of this set. Oh and don't forget to entry in my Blog Candy Give A Way :)
 Friday, April 3, 2009
Sneak Peek!!
 I wanted to share with you a sneak peek of my vintage "Pink Girl Fairy" collage set. It will be a card, envelope and gift box garnished with a vintage print brooch & will be listed soon. This glossy print is layered multipul times & the blinged out wings are at an angle. The hardware was pain stakingly picked from my vintage button collection. (just click on the picture for an up close look) I am having so much fun with these vintage prints, but do plan on doing some stamped images in the near future. I am very excited because I have a set (84) of Copic Markers on its way to me. What fun I will have with those. The rest of this set will be posted soon, but what do you think of it so far?


